Magic Mirror with DNS Filtering
February 06, 2017
Over a year ago I came across a Raspberry Pi project called Magic Mirror. I originally read about the project on Michael Teeuw’s blog. The project uses a one-way mirror to overlay a reflective property on a computer monitor, while allowing display elements to “magically” appear on the mirror. I liked this project and went ahead and built my own, but with a twist. This blog post will briefly cover my Magic Mirror build and how I use it to manage and filter DNS on my network.
The Magic Mirror Software
The Enclosure Build
The DNS Software
Michael Teeuw, the author of the original blog post, designed his Magic Mirror software as a framework and open-sourced it. It was comprised of a web server and some JavaScript. It was simple, but robust. My head buzzed with different ideas and features to improve the mirror. Unfortunately, the framework’s heavy lifting was written in JavaScript, which is not my language of choice. In addition, all of the content was kept up-to-date by JavaScript polling, which felt clunky and wrong. For these reasons, I set out to build my own mirror software using Python and websockets. This way I would be working in the world’s best scripting language and no polling would be necessary. I didn’t know much about websockets or their capabilities, so this direction offered a good learning experience as well. I came up with the following design:
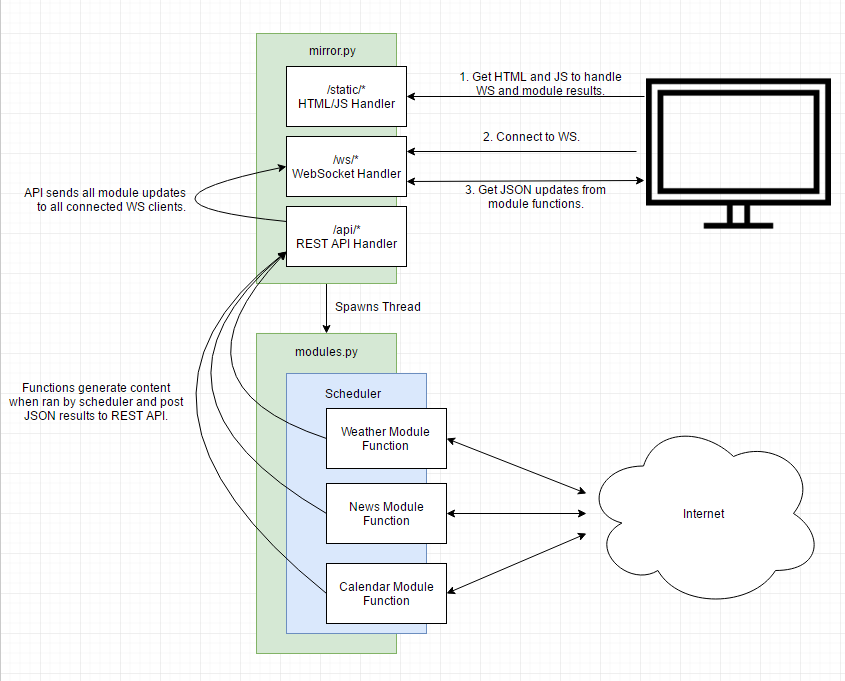
My design took advantage of Python’s Tornado Web Framework, which handled all of the web, websocket, and API functionality. I failed many times before coming up with this design. Over the course of a week I had it up and working! I used Twitter’s Bootstrap‘s powerful grid system to take care of all my web page positioning (because otherwise I would use HTML tables). I gave it a hacker styling and was happy. 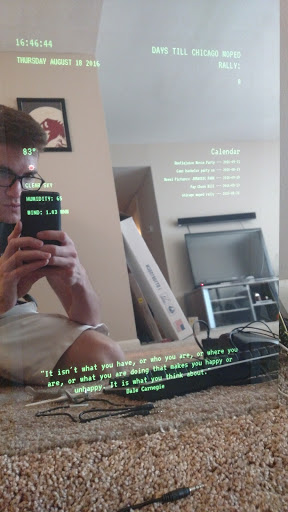
After I got it working, life happened and the project sat for months. I hadn’t built an enclosure, so it sat in pieces on my floor like a neglected brain child. 🙁 Eventually, I got some time, dusted off the mirror, and starting working on it again. For some reason, I decided to go back and look at Michael Teeuw’s framework. Since originally buying the components for my build, the Magic Mirror scene had exploded and Teeuw’s MagicMirror² framework had grown immensely. The project was now feature-full and mature, well beyond what I was capable of building myself. Although I loved the learning experience of building my framework, it no longer made sense to be the one-off. If I used the MagicMirror² framework, I would get lots of updates and access to a huge libray of modules. I installed MagicMirror² and haven’t looked back. The following commands are how I installed and started the framework:
|
1 2 3 4 5 6 7 8 9 |
//pulls down and runs the install bash script in the current directory //curl -> bash is pretty sketch. safer opition is to pull down the shell script and review before running. curl -sL https://raw.githubusercontent.com/MichMich/MagicMirror/master/installers/raspberry.sh | bash //assuming you are SSH'd into the pi, configure the display to localhost export DISPLAY=:0 //starts the MagicMirror2 framework in the background with nohangup, which lets it run even after closing SSH nohup npm start & |
After installing, I configured the framework and modules in: /MagicMirror/config/config.js
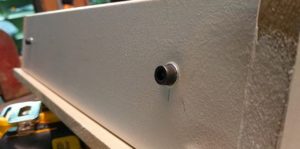
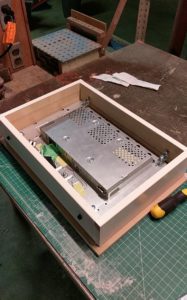
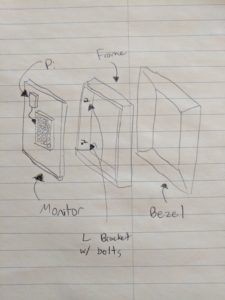
After installing and configuring MagicMirror², I knew if I didn’t build the enclosure, the mirror would sit in pieces collecting dust until the cycle repeated. So I got my ass in gear, and started planning. Even though all the plastic was removed from the monitor, there was still a small bezel (which can sort of be seen above). I cut my acrylic mirror to cover up to the outer edge of the bezel and cut my wooden bezel to cover the inner edge. I then built a snug frame around the outside of the mirror and nailed the wooden bezel to the frame. To assemble, I put the mirror into the frame first and butt it against wooden bezel. Next, I inserted the monitor into the frame and butted it up against the mirror. I then fashioned some “L” brackets and some bolts so the whole thing could be pressed tightly against the wooden bezel.
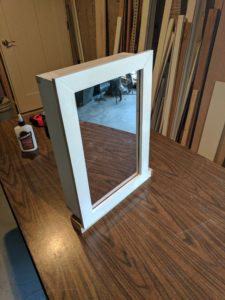

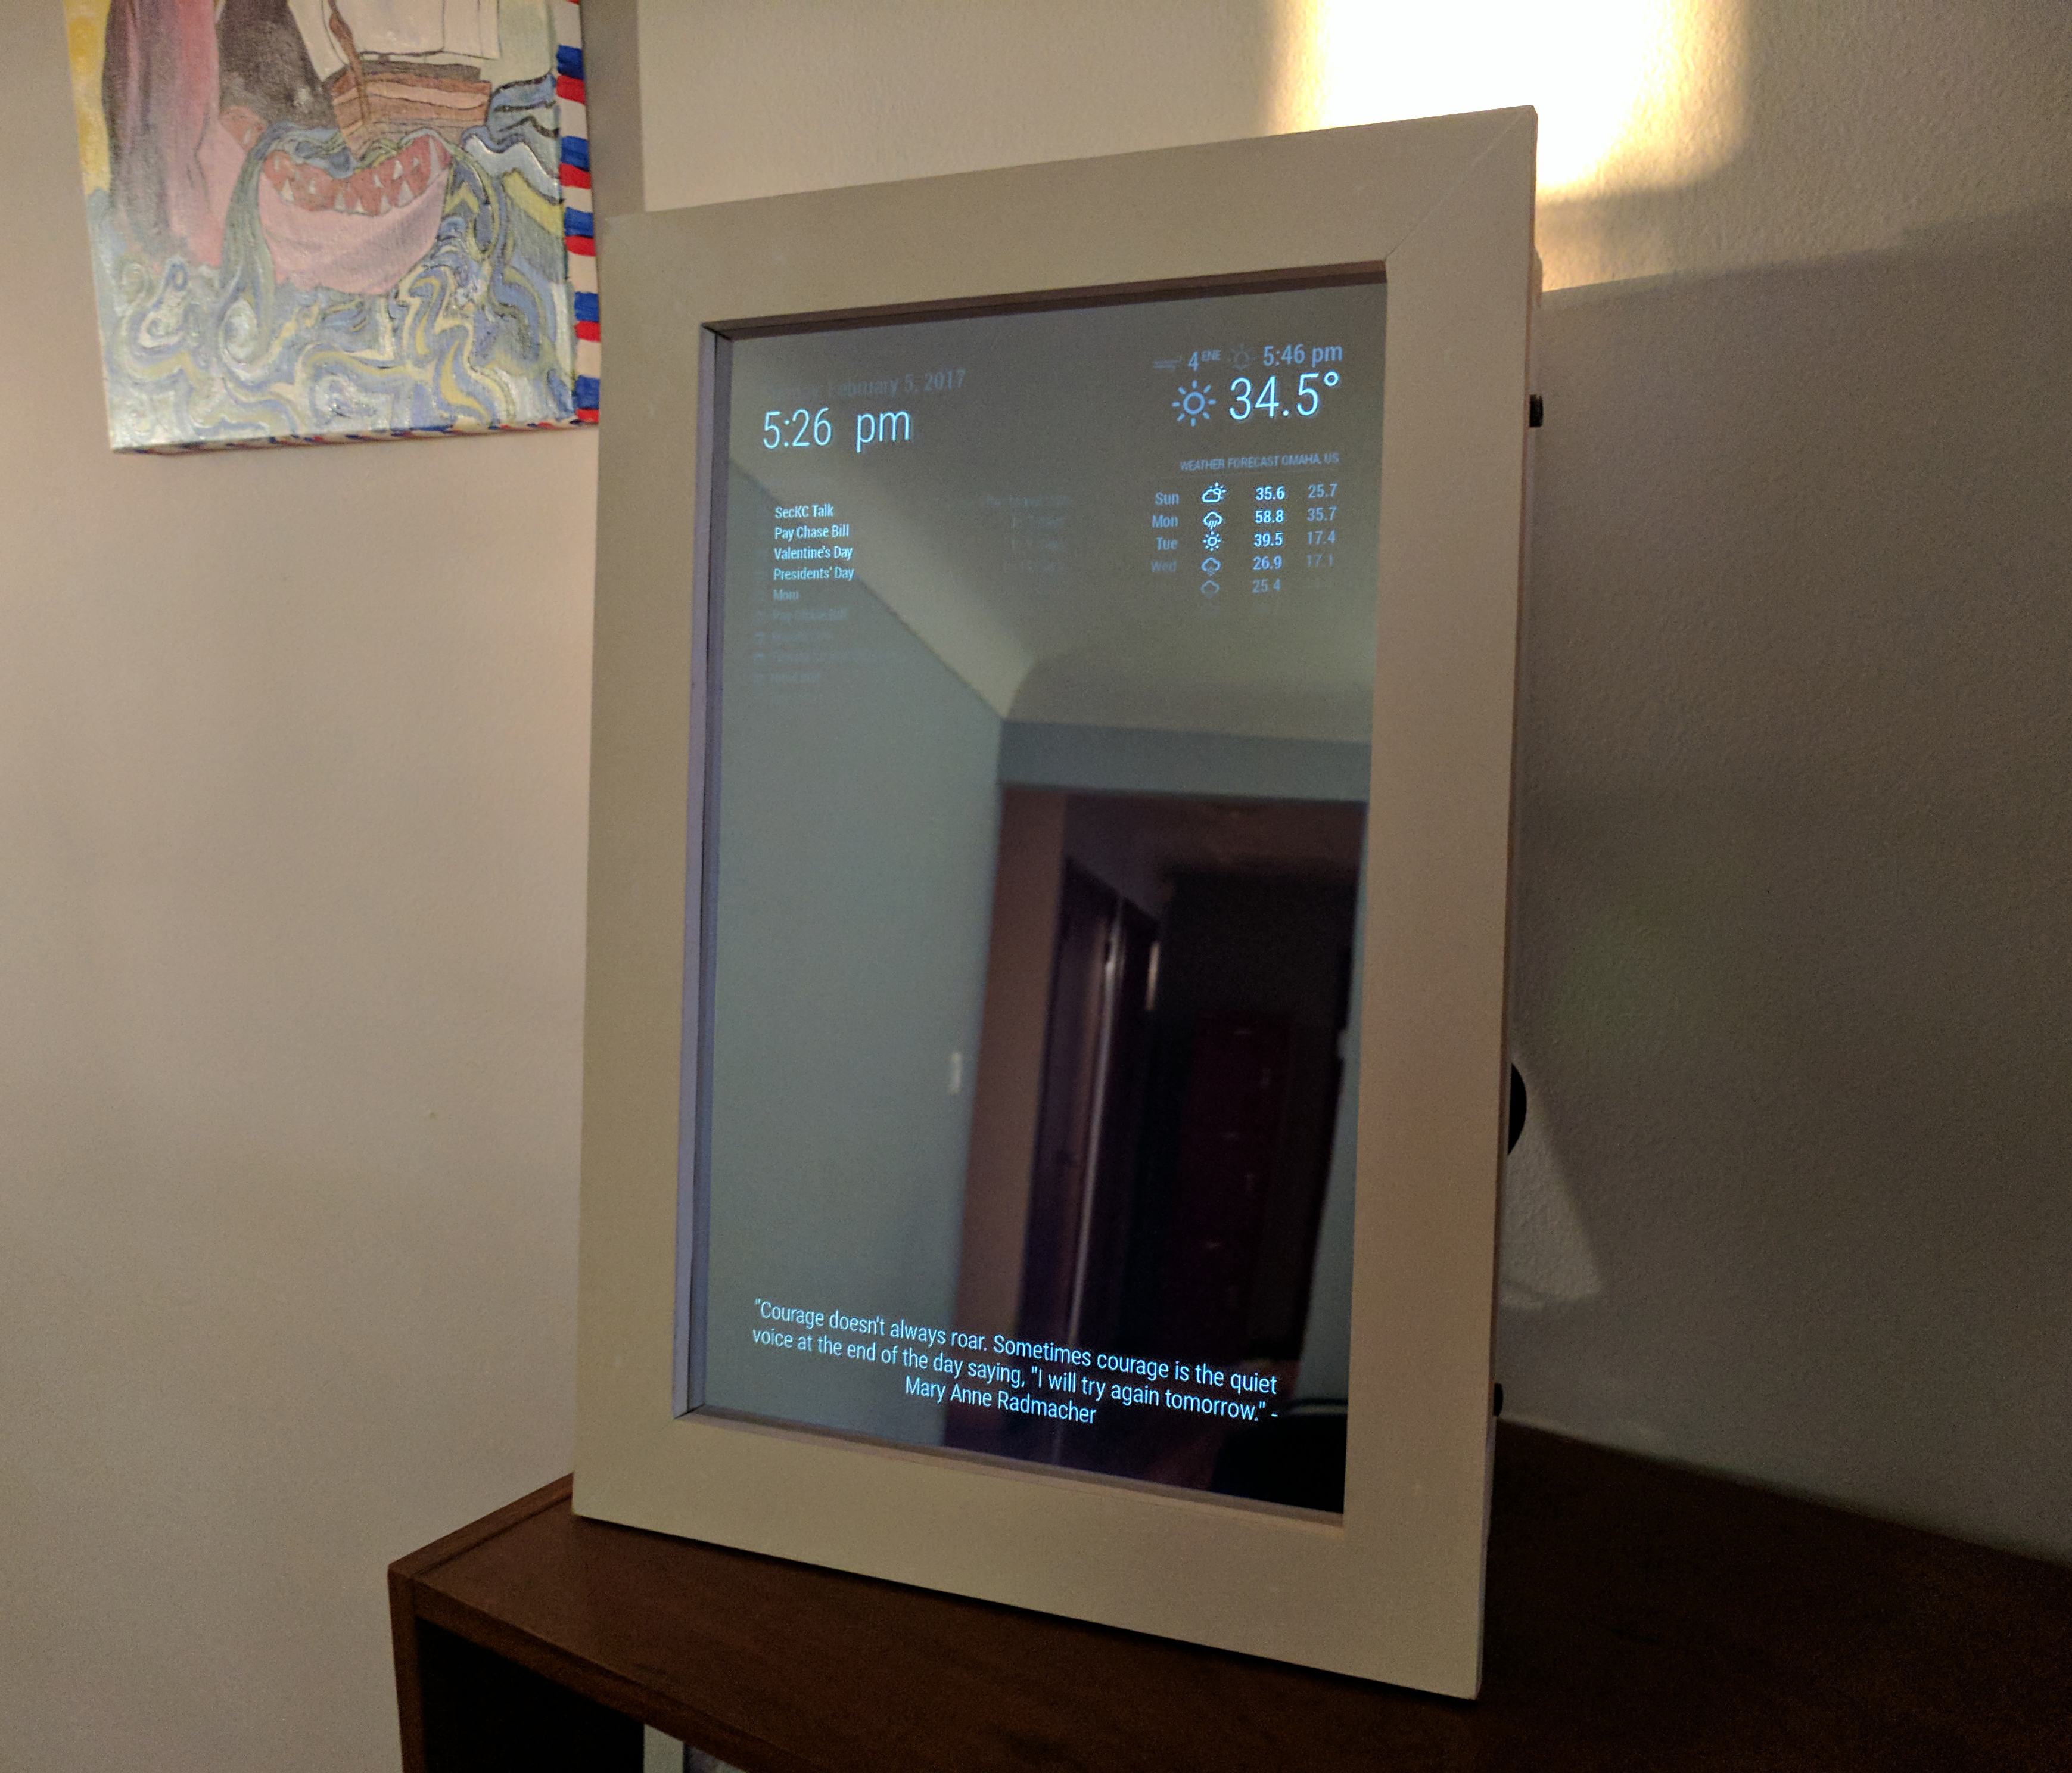
It turned out great!
Shortly after finishing the enclosure and finding a home for the mirror, I came across the following project: Pi-Hole. It acts as a DNS server and has a blacklist of ad and malicious domains. It does not allow any of the blacklisted domains to resolve. This helps block ads and malware without having to have software installed on clients (also blocks all that Win10 spyware). DNS filtering isn’t fancy or new, but this software is super easy to install and it works great. My logic was, if I am already maintaining a pi on my network, I might as well make it do more for me!
I used the following command to install pi-hole:
|
1 2 3 4 5 6 |
//pulls down and runs the install bash script in the current directory //curl -> bash is pretty sketch. safer opition is to pull down the shell script and review before running. curl -sSL https://install.pi-hole.net | bash //setup admin password pihole -a -p [passwordhere] |
After running this script, Pi-Hole is up and running! The script installed all of its necessary servers (web/DNS), configured itself, and made itself start on boot. It couldn’t get any easier.
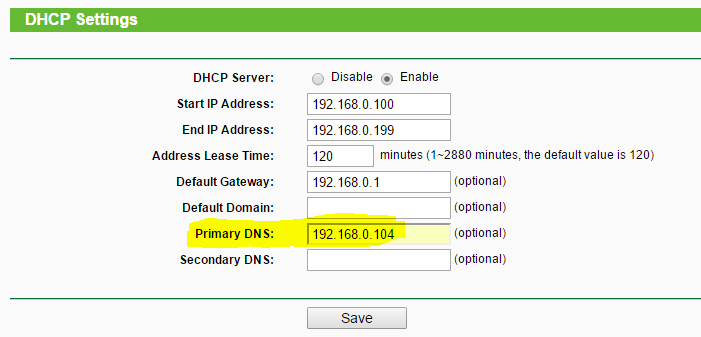
After installing Pi-Hole, you must update your network’s DCHP settings so that clients on your network use Pi-Hole as their DNS server.
After configuring the DHCP, you can then browse to http://pi.hole/admin. You should be greeted by the following screen:
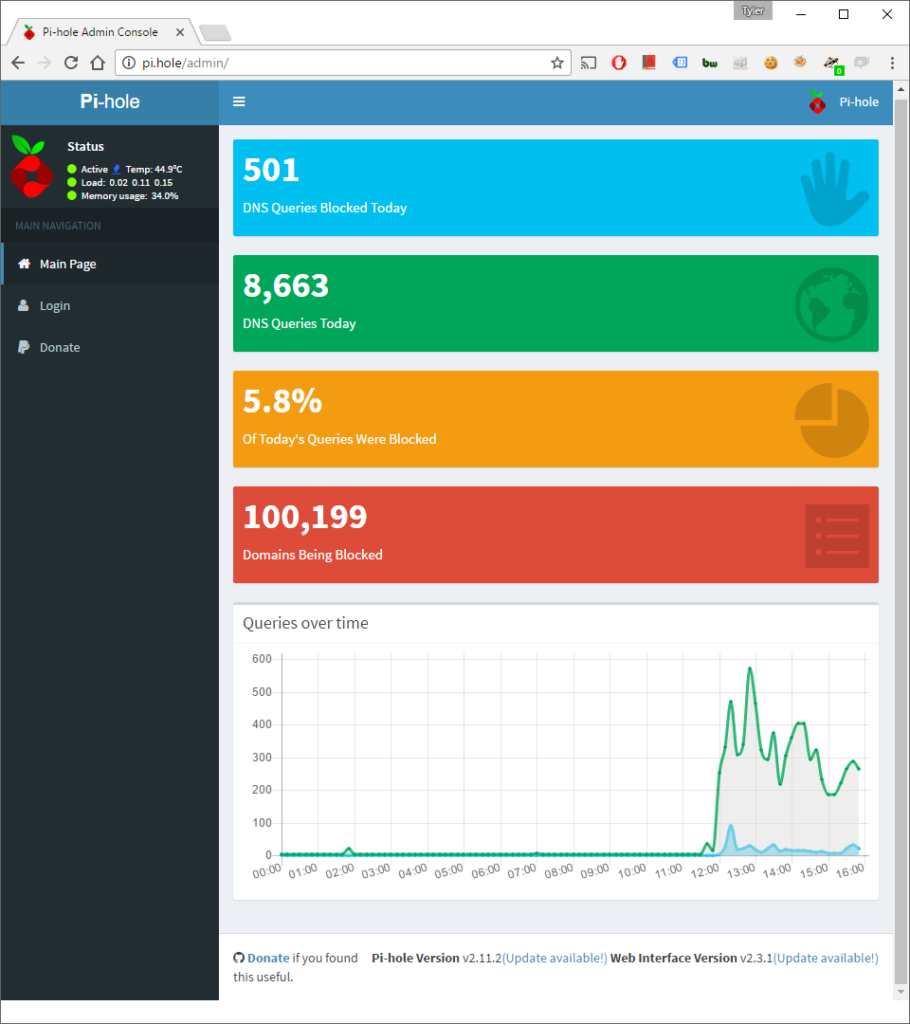
If you log into this interface using the admin password configured early, you get access to all sorts of useful features and statistics. The feature I use most is the “Query Log”, which lets you drill into all the DNS requests and opt to blacklist or whitelist future DNS requests for that domain. Out of the box, Pi-Hole comes with several domain blacklists located in: /etc/pihole/adlists.default. Any domain lists added to this file will be integrated into the blacklist. I added the following to my config:
|
1 2 3 4 |
#tyler's custom https://isc.sans.edu/feeds/suspiciousdomains_Low.txt http://www.networksec.org/grabbho/block.txt http://ransomwaretracker.abuse.ch/downloads/RW_DOMBL.txt |
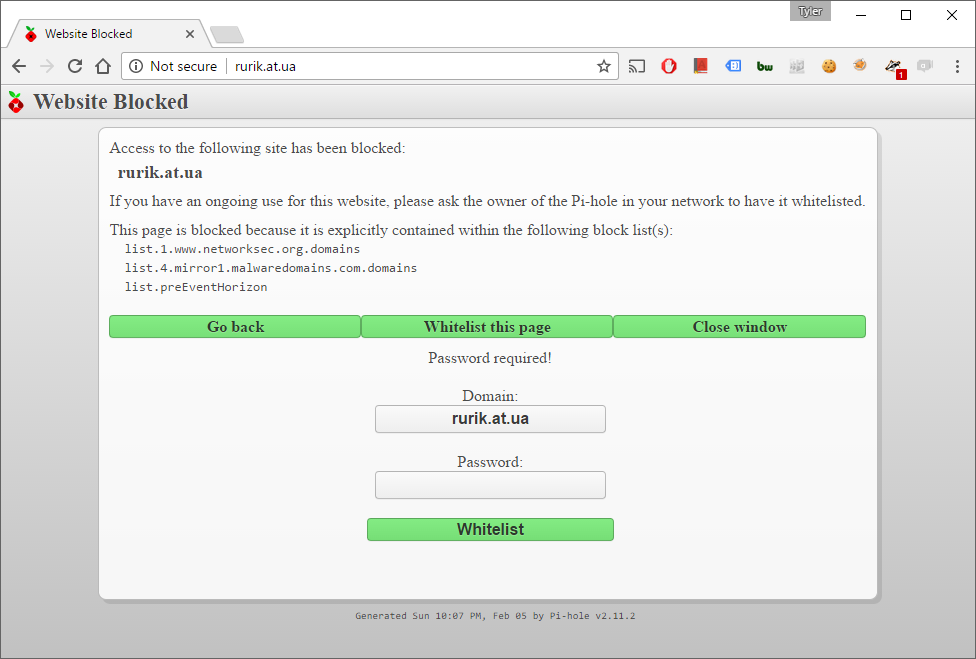
One of the features I like about Pi-Hole is that when it blocks a domain, it tells you which list caught the domain and allows you to whitelist it on the same page (provided you have admin creds).
The bonus feature of Pi-Hole is that any hosts defined in /etc/hosts on the pi will be resolved for anyone using the DNS server. I have lots of various machines on my network and even though I have all the IPs memorized by now, having DNS saves me a few keystrokes. Plus it feels more boss to bounce around my network by DNS. 🙂
You can also add this MMM-pihole-stats module to the MagicMirror2 framework, so you get Pi-Hole DNS stats on your mirror.

That’s pretty much it! I loved this project. I learned a lot along the way about websockets and DNS filtering. I keep the mirror by my front door and its so useful to see the weather and my schedule (GoogleCal) for the day. Thanks for reading!